Deer Hunting Field

Hunting Blog

  • Hunting
    • Best Coon Hunting Lights
    • Best Treestand Safety Harness
    • Best Hunting Boots
    • Best Rubber Hunting Boots
    • Best Muck Boots For Hunting
    • Best Treestand Safety Harness
    • Best Hunting Spotlights
    • Best Elk Hunting Boots
  • Archery
    • Best Arrow Rest
    • Best Bow Sights
    • Best Single Pin Bow Sight
  • Gun, Shooting & Accessories
    • Best Bipod for Long Range Shooting
    • Best Scope For Ar 10
    • Best Shooting Rest
    • Best AR 15 Bipod
    • Best AR 15 Slings
    • Best ACOG Clone
    • Best Shot Timers
    • Best Rifle Bipods
    • Best Shooting Tripods
  • Survival
    • Survival Shelter
    • Finding and Purifying Water in the Wilderness
  • About Us

Planting Soybeans For Deer – When Is The Best Time To Plant Soybeans For Deer?

Planting Soybeans For Deer – When Is The Best Time To Plant Soybeans For Deer?

This is an important question with more than one answer; you could waste a lot of time and money planting at the wrong time, and depending on what you are trying to achieve, and where you are geographically, the answer could vary greatly. A few of the things we will look at:

  • What is the effect you hope to have on your herd?
  • Are you trying to lower your winter kill rates?
  • Are you trying to increase the size and antler mass of your resident bucks?
  • Is this a plot you are preparing to hunt over during deer season?
  • What geographical location are you planting in?

By answering these questions, I will help you to decide when the best time to plant soybeans for your deer is.

Why are you planting soybeans for deer?

It seems like a pretty simple question and answer, but is it really? Many people plant soybeans with the intent of creating body and antler mass in their resident bucks. Of course any time you can feed your deer quality nutrition, you are going to see corresponding growth in both areas.

Related:When Do Deer Shed Their Antlers? Want to Know When to Hunt For Antlers?

soybean food plot

But what if your region experiences extremely harsh winters? Might it not be beneficial to provide a crop that can help your deer herd through winter, reducing the winter mortality rates?

If your intention is to create a few monster bucks for hunting season, then by all means, get those beans in the ground as early as possible. You will want the high protein and mineral forage available to your herd during the crucial time they are in velvet.

If this is the case, you will want to plant after your last spring frost and when the soil temps, at one inch planting depth, are consistently 65 degrees Fahrenheit. This usually means late May or early June in the northern states, and late April or early May in the southern.

Related:Best Deer Hunting States-Go on a Trip: Here’s the Best 7 States for Whitetail

Keep in mind, you will either need a large enough plot to bear the feeding pressure of your resident herd, or you will need to deter them from feeding in some manner until the plants are mature.

It is a good idea to deter feeding for 4-8 weeks in areas with heavy deer pressure, during cooler than normal temperatures, or if your plot is a small one.

soybeans-for-deer

When should I plant if I am trying to reduce winter kill in my deer herd?

In some areas with extremely harsh winters, where the mortality rate is high among your deer herds, then planting later, and providing forage as late into the winter months as possible, might be the answer for you.

Related:The Best Guide For When To Plant Turnips For Deer

Soybeans have a tendency to mature faster when planted later in the growing season. For every three days you delay planting, you only delay “harvest” by one day. Keep in mind that a good frost will kill them, so ideally you need those plants to be mature before that happens.

In the northern states, the first frost can come as early as mid September, so you will have to plan accordingly for your shorter growing seasons. There are good seed companies out there.

that have seed mixes specifically for your geographic area. They mix several varieties of soybean that have staggered maturation rates, keeping your plots viable for a longer period of time

Are you planning on hunting your food plot?

If you are planning on being able to hunt over your food plot, come hunting season, then of course you will need to have your bean crop mature enough to draw the big bucks with the promise of good, high fat and protein forage.

deer-eat-soybean

Deer use the fat in soybeans to help maintain their body temperature, so when the nights are getting cold during hunting season, they will likely be drawn to your food plot. Of course, in order to do this, your plot must be producing a good quantity of seed pods, as this is where the majority of these nutrients are held.

With this goal in mind, I would plant as late as possible while still allowing your soybeans to mature and produce as much as possible. This has the further benefit of providing nutrition to your herd well after hunting season closes, when they need it the most, allowing you to retain more and healthier deer for the next season.

FURTHER READING➜Do You Know When To Plant Food Plot For Deer?

➜ What Do Deer Eat In The Winter?  

As you can see, the question of when to plant soy beans for deer is a complicated one.

There are so many variables to take into account, that there really isn’t one standard answer. We talked about the impact that you are hoping for on your deer herds, whether you are trying to create mass in your bucks, we talked about winter mortality, how the plots will be utilized, we even touched on geographical requirements and planting seasons.

This is a lot of information to consider for such a simple question as, “When should I plant soy beans for deer”, but I hope that I at least made the decision a bit more clear-cut, and gave you some things to think about before you put seed in the ground.

Filed Under: Hunting 20:39 by Kevin Steffey

How To Bleach A Deer Skull-No Waste: 5 Simple Steps to a Beautiful Skull Trophy

How To Bleach A Deer Skull-No Waste: 5 Simple Steps to a Beautiful Skull Trophy

When it comes to hunting, one of the best parts for many of us is taking and cleaning trophies. Whether it’s a rack of antlers or a pelt, they make for impressive talking pieces. One of the favored of deer hunters everywhere is a nice, white skull.

It’s something of an involved process, but if you follow these instructions we can show you how to bleach a deer skull to a sparkling white that will leave you the envy of your hunting friends.

In this blog post, we’re going to show you how to bleach a deer skull. This is a great way to preserve your hunting trophy and keep it looking its best.

We’ll walk you through the steps of prepping the skull, bleaching it, and then sealing it. With just a little bit of effort, you can have a beautiful trophy that will last for years to come. Let’s get started!

Read More: How To Choose Best Rubber  Hunting Boots

What is a bleach a deer skull

Bleaching a deer skull is the process of using Hydrogen peroxide to remove all the flesh and tissue from the bone, leaving behind a clean white skeleton. This is typically done by boiling the skull in a large pot, though there are other methods which can be used.

The advantage of bleaching your own deer skull is that you can control the level of whiteness, as well as how long it takes for the process to be completed. It also allows you to add any additional decorations or finishes that you desire.

The downside of this method is that it can be quite time consuming, and if not done properly can result in damage to the skull. It is also important to note that hydrogen peroxide is a hazardous chemical and should be handled with care.

Why bleach a deer skull?

The most common reason to want a bleached deer skull is for mounting purposes. A nice, white skull makes for an excellent contrast against a dark pelt and really makes the rack stand out. It’s also much easier to work with when it comes to hanging or attaching to plaques and logs.

Another good reason is that it just looks cool. If you’re looking for a unique piece to add to your décor, a bleached deer skull definitely fits the bill. They make great conversation starters and can really add some personality to a room.

What You’ll Need

Make sure to gather what you need before you get started. Since the process will take a few days, we’ll list them in the order you’ll need them to give you a good overview of the whole thing and you can definitely purchase things as you go.

  • Deer Head
  • Sharp Hunting or Skinning Knife
  • A Pot Large Enough for the Skull
  • A Two By Four Big Enough to Fit Across the Pot
  • Hydrogen Peroxide of at Least 6% Concentration
  • Spray On Clear Coat in Your Desired Finish
  • Optional: A Plaque or Log

If you’re averse to boiling, you might want to look into deremestid beetles and if you’re not the type who’s willing to raise them yourself then there are services available online which can handle the cleaning process for you with them. You’ll definitely want to invest if your deer is a true trophy, as it reduces the risk of damage from boiling.

The hydrogen peroxide can be a bit difficult to source in large enough quantities and chemical suppliers are generally unwilling to sell them to private individuals. It is, however, used for bleaching hair and is available through hair product suppliers quite easily.

Do not attempt to use bleach in lieu of hydrogen peroxide, it will damage the bone irreversibly and makes for an inferior whitening agent anyways.

Related:Where To Shoot A Deer – Top 5 Best Places To Shoot A Deer

How To Bleach A Deer Skull- In 5 Steps

1.) Cleaning the Skull

how to whiten a deer skull

Before you can even begin the process, you’ll need to have skinned and scraped the skull to get it ready for the further preparations you’ll be wanting to do. Removing the head with a saw before preparation can make things rather easy, then remove the eyes and get to skinning and scraping.

Assuming you’ve cleaned a deer before, the initial part is quite simple but the scraping is a little bit more specialized of a skill. With a good knife, you can make short work of this task. Don’t worry too much about getting every little bit off of the bone just yet, that’ll be taken care of in the next step.

Your goal here is to get as much off as you can without damaging the skull in any visual way, so have at it and try not to scratch the bones.

Protip: You can skip this and the next step if you want by utilizing deremestid beetles, professionals who work with bones often opt to do this but it’s an entirely different skillset if you don’t opt to send your skull off.

2.) Boiling

boiling deer skull

Once you’ve done the rough cleaning, it’s time to start the process in earnest. You’ll begin by adding calcium carbonate to water at a ratio of ¼ cup per gallon of water. This can be a bit tricky of a process, but as long as you’re careful you’ll be good.

Bring the treated water to a rolling boil, but do not add the skull to the water while it’s at this level). Allow temperature levels to fall to a simmer and place the skull in the water for thirty minutes or so. Scrape it again, the flesh and hair bits should come off easily.

Once you’ve done this, use a hose to clear out the nasal tissues and brain and boil for another twenty minutes or so if there’s still tissue left. Don’t over-boil, this can damage the jaw, loosen the teeth, and have other unintended side effects which will make your trophy less attractive.

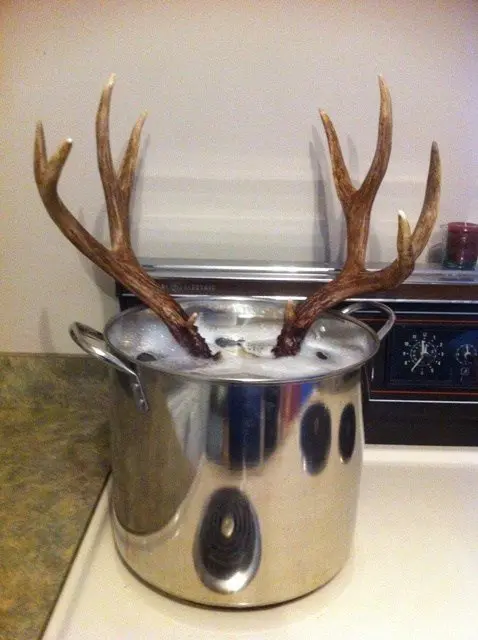
Protip: You can easily keep the antlers clear of the water by hooking them onto a board held over the pot. Use wood thick enough it won’t bend from a little bit of steam and you’ll be golden.

3.) Peroxide Whitening

deer skull

You’ll want to let the skull dry out entirely before this step, allow it to sit until there’s no moisture at all. It’s best to do this in the shade, although it will add some time the slower drying process can avoid damage to the skull.

It’s imperative to set up the bath in this instance without getting the antlers in it. Hydrogen peroxide can be a bit difficult to source in quantities, so try hair dressing suppliers. Anything from 12% down will work pretty well, higher concentrations aren’t ideal and are harder to get ahold of anyways.

Mix it 50/50 with water and allow it to soak until it’s reached a desired level of brightness, the bone will actually dry out and look a bit lighter than it does while wet. The process can take a few days, but don’t forget about the skull or you can damage it.

4.)Clear Coat Lacquer the Skull

mule deer skull european mount for sale 14653 the taxidermy store

Once you’ve let the peroxide dry off, you can quite easily help to maintain the finish of your skull and antlers for a Euro-mount or whatever use you want to keep it for by applying a clear coat of spray lacquer.

The finish you want to go for will depend on your personal tastes. I like to use a matte finish to give the sun-bleached, untouched bone look but some will prefer to go with a gloss or satin finish which can result in a very attractive finished skull albeit one that’s obviously been altered post-bleaching.

This doesn’t just give your skull a nice finish, it can also help to prevent mold or anything else from getting into it and will keep air from yellowing the skull for a long time to come.

5.) Optional: Mounting

skull-mount-8point-whitetail

Many hunters opt for the attractive Euro-mount style after finishing their skulls off. The skull will be placed on a plaque, parallel to the wall and facing downwards in order to show off the rack.

Many hunters will opt to use a belt sander to level out the bottom of the skull and ensure a flush mount in order to maintain a perfect angle. You can easily attach it by running two screws through the back of the plaque and into the skull just be careful about the length and placement as you don’t want things to protrude.

A more creative mount can be made by slicing the front piece of a log out with the bark included, screwing the skull on, and then reattaching the front of the log to make for a round “post” style of mount.

Tips for bleaching a deer skull

1. Thoroughly clean the skull before bleaching to avoid any damage.

2. Use a mild bleach solution and let it soak for 30 minutes to an hour.

3. Scrub the skull gently with a toothbrush to remove any remaining flesh or tissue.

4. Rinse the skull well and allow it to dry completely before applying a clear coat of lacquer.

5. Optionally, you can mount the skull using a belt sander to ensure a flush mount.

6. Enjoy your beautiful deer skull!

Conclusion

We hope that we’ve given you some ideas on how to bleach a deer skull and what to do with it afterwards. While hunting strictly for trophies is often frowned upon, there’s no need to let any of the animal go to waste once it’s been harvested and with a few simple steps you can make an attractive trophy with minimal fuss and skills required.

Like our tutorial? Have your own methods? Let us know in the comments below.

FAQ How To Bleach A Deer Skull

How do you keep a deer skull from rotting?

The best way to keep a deer skull from rotting is to thoroughly clean it and then apply a clear coat of lacquer. This will seal the skull and prevent any air or moisture from getting in and causing it to rot.

How do you get the brains out of a deer skull for mounting?

The easiest way to remove the brains from a deer skull is to boil it for 30 minutes to an hour. This will loosen up the brain matter and make it easier to remove. You can then rinse the skull well and allow it to dry completely before mounting.

How do you clean a deer skull for euro mount?

The best way to clean a deer skull for euro mount is to boil it for 30 minutes to an hour. This will loosen up the brain matter and make it easier to remove. You can then rinse the skull well and allow it to dry completely before mounting.

How long does it take to bleach a deer skull?

It usually takes around 24 hours for the bleach to work its magic on a deer skull. However, you may need to let it soak for longer if the skull is particularly dirty or greasy.

How do you whiten a deer skull?

The best way to whiten a deer skull is to use a mild bleach solution and let it soak for 30 minutes to an hour. You can then scrub the skull gently with a toothbrush to remove any remaining flesh or tissue. Rinse the skull well and allow it to dry completely before applying a clear coat of lacquer.

What do you use to bleach a deer skull?

The best thing to use to bleach a deer skull is a mild bleach solution. You can make your own by mixing one part bleach with ten parts water. Let the skull soak in the solution for 30 minutes to an hour before scrubbing it gently with a toothbrush. Rinse the skull well and allow it to dry completely before applying a clear coat of lacquer.

How long do you soak a deer skull in bleach?

You can soak a deer skull in bleach for anywhere from 30 minutes to an hour. However, you may need to let it soak for longer if the skull is particularly dirty or greasy.

What is the best way to mount a deer skull?

The best way to mount a deer skull is to use a belt sander to ensure a flush mount. You can also attach it by running two screws through the back of the plaque and into the skull just be careful about the length and placement as you don’t want things to protrude. A more creative mount can be made by slicing the front piece of a log out with the bark included, screwing the skull on, and then reattaching the front of the log to the back. This will give the skull a 3-D look.

Can you put a deer skull in the oven to dry it?

You can put a deer skull in the oven to dry it but be very careful not to overheat it as this could cause the Lacquer to melt or the bone to crack. A better option is to use a hair dryer on low setting if you need to speed up the drying process.

How do you whiten an old deer skull?

You can whiten an old deer skull by using a mild bleach solution and letting it soak for 30 minutes to an hour. You can then scrub the skull gently with a toothbrush to remove any remaining flesh or tissue. Rinse the skull well and allow it to dry completely before applying a clear coat of lacquer.

How do you clean a deer skull cap?

The best way to clean a deer skull cap is to boil it for 30 minutes to an hour. This will loosen up the brain matter and make it easier to remove. You can then rinse the skull well and allow it to dry completely before mounting.

How do you get the meat off a deer skull?

The easiest way to remove the meat from a deer skull is to boil it for 30 minutes to an hour. This will loosen up the brain matter and make it easier to remove. You can then rinse the skull well and allow it to dry completely before mounting.

Can you put a deer skull in the dishwasher?

You can put a deer skull in the dishwasher but be very careful not to overheat it as this could cause the Lacquer to melt or the bone to crack. A better option is to use a hair dryer on low setting if you need to speed up the drying process.

How do you clean a deer skull for wall mounting?

The best way to clean a deer skull for wall mounting is to boil it for 30 minutes to an hour. This will loosen up the brain matter and make it easier to remove. You can then rinse the skull well and allow it to dry completely before mounting.

Is it legal to possess a deer skull?

In most states, it is legal to possess a deer skull as long as it is not attached to the carcass. However, it is always best to check with your local wildlife department to be sure.

What do you do with a deer skull?

There are many things you can do with a deer skull including mounting it, using it for crafts, or simply collecting it. You can also have it professionally cleaned and whitened to create a unique piece of art.

How much does it cost to get a deer skull cleaned?

The average cost to have a deer skull cleaned is $50 but this can vary depending on the size and condition of the skull. It is also important to factor in the cost of shipping if you plan on having it done by a professional.

Where can I find a deer skull?

You can find a deer skull at many different places including hunting stores, online retailers, and even some thrift stores. You can also find skulls for sale on websites like eBay and Craigslist.

How do you clean a deer skull with the meat still on it?

The best way to clean a deer skull with the meat still on it is to boil it for 30 minutes to an hour. This will loosen up the brain matter and make it easier to remove. You can then rinse the skull well and allow it to dry completely before mounting.

Can you use vinegar to clean a deer skull?

Yes, you can use vinegar to clean a deer skull but be sure to dilute it with water as undiluted vinegar can damage the bone. You can also add a few drops of essential oil to the vinegar solution to help mask the smell.

What is the best way to clean a deer skull?

The best way to clean a deer skull is to boil it for 30 minutes to an hour. This will loosen up the brain matter and make it easier to remove. You can then rinse the skull well and allow it to dry completely before mounting.

How do you remove the brain from a deer skull?

The easiest way to remove the brain from a deer skull is to boil it for 30 minutes to an hour. This will loosen up the brain matter and make it easier to remove. You can then rinse the skull well and allow it to dry completely before mounting.

Can you use bleach to clean a deer skull?

Yes, you can use bleach to clean a deer skull but be sure to dilute it with water as undiluted bleach can damage the bone. You can also add a few drops of essential oil to the bleach solution to help mask the smell.

How long does it take to Whiten a deer skull?

The amount of time it takes to whiten a deer skull will vary depending on the method you use. If you are using a chemical whitener, it could take anywhere from a few hours to a few days. If you are using a natural method like soaking in the sun, it could take weeks or even months.

What is the best way to Whiten a deer skull?

The best way to whiten a deer skull is to use a chemical whitener specifically designed for skulls. These can be found at many hunting and taxidermy stores. You can also find them online at retailers like Amazon.com.

Filed Under: Deer Hunting 18:42 by Kevin Steffey

How To Build A Deer Blind-Anyone Can Do it! How to Build a Box Blind

How To Build A Deer Blind-Anyone Can Do it! How to Build a Box Blind

When it comes to hunting deer, a blind is a favorite for many hunters. They can be especially useful if you own or allowed to build on the land you’re using to hunt on, since you’ll be able to build a permanent structure in their place. No matter what your building skill level, if you follow this simple guide, you’ll soon know how to build a deer blind that’ll be unnoticeable and allow you a chance at the big ones.

Read More: Best Rubber Hunting Boots

What You’ll Need

You don’t need a whole lot to build a blind. Basically, the less skilled you are, the more you’re likely to have to spend. For this blind, we’re going to go with a basic wooden construction and some camouflage, so you’ll need the following.

  • Basic carpentry skills
  • Basic tools(screw gun or hammer and nails)
  • Two four by fours for the base
  • Enough two by fours for the framing
  • Enough plywood/particle board to skin the blind
  • Six hinges of equal size

Since this will be a box blind, you’ll want to measure out how big you want things. Make sure you have enough room for you to crouch with your rifle and have a rifle rest if you prefer to use one.

Most of the wood can be found as scrap, but make sure that you buy the framing wood new in order to ensure the structural stability of the blind. It won’t do you much good if the whole thing falls on your head after a season or two.

You may want to consider investing in some metal joints if you’re in an area where the temperature varies a lot as well. These are optional for the most part, but wood changes in size by a noticeable amount with the temperature and the brackets can make the whole process a lot easier.

Keep in mind we’re making a box blind that anyone at all can build, if your construction skills will let you do something more advanced than allow your creativity to run free.

How To Build A Deer Blind

1.) Location, Location, Location

how to build a box blind deer stand

http://www.scout.com/outdoors/whitetail-deer

While you can build your blind anywhere, you’ll want to make sure that you find a spot where you’ll be likely to find the deer. If you’re on managed land this is pretty simple for the most part, face the rifle doors at a food plot that’s under heavy use during your favored time of the season.

If you’re not quite sure where the deer are in the area, you’ll want to make sure that you do some scouting first. This is an essential part of the process for any kind of hunting, but a blind limits your sight much more than a stand so you’ll want to make sure that you’re facing the right direction.

Related: Best Deer Hunting States-Go on a Trip: Here’s the Best 7 States for Whitetail

Protip: If you have truck access to an area, you may want to consider building the blind entirely at home and then dropping it off. This will both allow for easier access to tools and make less of a disturbance in the area you plan on hunting in.

2.)The Foundation

how to build hunting blind

For the most part, this is a simple process. Simply take your four by fours and place them to support the stand. By elevating the stand off the ground a little bit you’ll be able to keep bugs out, so there won’t be any distractions while you’re waiting.

Cut the four by fours so that you can lay them out with about six inches sticking out on either side of your floor. Cut the boards for the floor, and lay down the foundation for your frame using some of your plywood..

.

3.)Framing it Up

how to build deer blinds

If you’re not much of a framer, you might want to ask a friend, but the process is quite simple. You’ll simply be matching off the two by fours in order to provide the proper structure. If you’re not quite sure what you’re doing, buy some steel brackets and make sure they’re drilled before you go out since they’ll be able to guide you quite well.

You’ll want reinforcement along the longer sides if you’ve decided on a rectangular design. As long as the blind is reasonably sized, a single extra two by four running to the top will be enough for the most part.

After the initial frame is stable, you’ll want to build the door frame and the “windows” for your rifles. The door frame will be the trickiest part for the novice, but if you build your door at home you’ll be able to size it quite readily in the field.

4.) Skinning It

how-to-build-deer-blind-windows

http://www.texascedarblinds.com/

Cut the plywood or particle board to match the sides. Make sure that you leave openings for the door and the rifle ports or you’re really not going to be doing too hot when it comes time to use it. Don’t worry about decoration just yet, you’ll be taking care of that after you get the doors on. Most people use galvanized steel for their roof, and it’s definitely a worthy choice.

The main thing here is to ensure everything is airtight, especially if you’re using scrap wood for this part of the endeavor. If your lumber is of questionable quality, try bringing along some silicone or other sealant in order to keep the stand nice and temperate while you’re spending long hours waiting for your deer.

5.) The Doors and Ports

how to build a 4x6 deer blind

http://www.realtree.com/deer-hunting/articles/crazy-deer-stands

The doors can be something of a challenge if you’ve never done anything like this before. While your rifle ports can simply be affixed to the existing skin with hinges and screws the actual entrance to the stand will be a bit trickier.

Try building the door at home and taking it out as one piece. If it matches off while framed, all you’ll need to do is attach the hinges. Allow for about an eighth of an inch of clearance in order to prevent issues with the wood swelling as temperature and moisture levels change throughout the year.

Protip: Keep all of the hinges lubricated in order to prevent any extra noise. The hinges themselves will most likely take some weathering after being out, even if you spring for stainless steel. A good fix is something with as little scent as possible if you find yourself with a squeaky door in the season, but the better way to do it is to check on the blind a few times in the off-season to make sure.

6.) Camouflage

how to build a deer blind window

Filed Under: Hunting 02:07 by Kevin Steffey

  • « Previous Page
  • 1
  • …
  • 43
  • 44
  • 45
  • 46
  • 47
  • …
  • 49
  • Next Page »
  • AffioraTool Privacy Policy
  • AffioraTool
  • Best Shooting Rest Reviews For A Perfect Hunting – Best Shooting Rests Reviews
  • Hunting Safety: 5 Best Treestand Safety Harnesses Reviewed
  • How Fast Can A Deer Run – How Hard Would It Be To Catch A Frightened Deer On The Run
  • Rice Bran for Deer- How to Effectively Use Rice Bran to Attract a Deer?
  • The Best Reloading Scale for Consistent Accuracy
  • Which Shotgun Choke Is The Most Open?
  • 17hmr vs 22lr: Which one Should You Use?
  • 5 Top Coyote Hunting Dogs That Are Proven To Be Tremendous Hunters

DMCA.com Protection Status

Deerhuntingfield.com is a participant in the Amazon.com Services LLC Associates Program, an affiliate advertising program designed to provide a means for sites to earn advertising fees by advertising and linking to Amazon.com. Additionally, deerhuntingfield.com participates in various other affiliate programs, and we sometimes get a commission through purchases made through our links.