Deer Hunting Field

Hunting Blog

  • Hunting
    • Best Coon Hunting Lights
    • Best Treestand Safety Harness
    • Best Hunting Boots
    • Best Rubber Hunting Boots
    • Best Muck Boots For Hunting
    • Best Treestand Safety Harness
    • Best Hunting Spotlights
    • Best Elk Hunting Boots
  • Archery
    • Best Arrow Rest
    • Best Bow Sights
    • Best Single Pin Bow Sight
  • Gun, Shooting & Accessories
    • Best Bipod for Long Range Shooting
    • Best Scope For Ar 10
    • Best Shooting Rest
    • Best AR 15 Bipod
    • Best AR 15 Slings
    • Best ACOG Clone
    • Best Shot Timers
    • Best Rifle Bipods
    • Best Shooting Tripods
  • Survival
    • Survival Shelter
    • Finding and Purifying Water in the Wilderness
  • About Us

What Is The Main Difference Between Centerfire And Rimfire Ammunition

What Is The Main Difference Between Centerfire And Rimfire Ammunition

When it comes to ammunition there’s a lot of technical language that can go over the head of the novice. One of the main things that is confusing to beginners is figuring out what is the main difference between centerfire and rimfire ammunition.

If you’ve been wondering, we’re here to answer your question and give you some further information to help you figure out which type of ammo is best for your needs.

The Location of the Primer

Centerfire and Rimfire

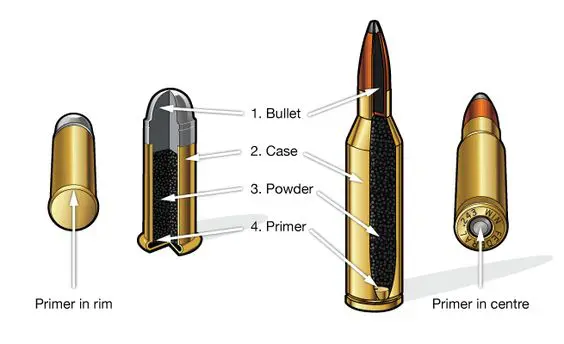
The location of the primer is the thing which determines whether a cartridge is considered to be rimfire or centerfire.

The primer is a small piece of shock sensitive explosive which explodes when the firing pin hits it. While the explosion is quite small, it is enough to ignite the powder contained within the cartridge. The expansion of the gasses then propels the bullet from the shell casing.

Rimfire rounds will tend to be smaller. While it’s certainly possible to use them in a larger round, the construction of the case of the cartridge has to be small and light in order to allow the firing pin to ignite the whole process.

In modern times they are really only available in .22 and .17 rounds, pretty much any other gun will utilize a centerfire primer.

Centerfire rounds are much more common, with nearly all rounds larger than a .22 being made with this type of primer.

The process is quite similar to a rimfire cartridge, but instead of striking the edge to create the initial spark for the gunpowder it strikes the center. The primers are contained in a small metal cup in the center of the round.

The reason for switching primarily to centerfire rounds is pretty easy to see if you’re a fan of reloading your own ammunition. Brass cartridges are expensive, and you can reload the round since the casing isn’t usually damaged in the process of firing one.

FURTHER READING:

➜ What Are The Basic Parts Of Ammunition?

➜ How Far Can A Bullet Travel? How Far Does A Bullet Travel

➜ How To Hold A Rifle Steady – The Best Way To Hold A Rifle Steady

Rimfire vs. Centerfire Pros and Cons
Rimfire vs. Centerfire Pros and Cons

https://www2.huntercourse.com

Each type of primer has their own advantages, and while you’ll be limited to one type or the other depending on what type of rifle you’re using it can help to illustrate the difference if you delve into the advantages and disadvantages of each.

Rimfire Pros and Cons

Rimfire-Pros-and-Cons

Rimfire cartridges are cheaper. There’s simply less brass in the case, and it’s still an ideal way to manufacture smaller caliber rounds since they can be produced quite cheaply in lots since they require less materials.

Related:

​Shoot Straight! The 5 Best Rifle Bipods Reviews

30-30 vs 308: The Best Deer Cartridge Showdown 

The .22LR is the most common round in the world and is a good choice for small game hunting and target shooting, since it has a mostly flat trajectory and won’t tear the meat and pelt up.

Most of the advantages given to rimfire ammunition come solely from the fact that it’s only made in lighter calibers.

The most powerful round using this kind of primer is probably the .22WMR, a magnum round that punches a pretty good punch for being so small.

They’re light in recoil and usually quite accurate, which is one of the reasons why most shooters will find themselves with a .22 of some variety on their first few outings.

That said, more experienced shooters rarely use them for most applications after they get used to getting a good sight picture and get down the basics.

The thinner case is the main thing that keeps more powerful rounds from being manufactured with a rimfire primer, the brass won’t hold up under the pressure required to lob a super powerful shot.

They also can’t be reloaded since the casing will be damaged irreparably after they’ve been fired. This can be a hassle, and means you’ll have to get down to the store in between outings if you manage to shoot everything you have in your bag.

This normally isn’t a problem, since .22LR are extremely cheap but those who are planning on using .17 of any sort should keep in mind that those rounds are usually quite high-tech and they can cost a significant amount more than .22 rounds.

There’s generally a dud or two in each box as well, they’re not quite as reliable as centerfire rounds. This can be alleviated to some extent by buying only high-quality ammunition, but it’s not a guarantee that they’ll all fire perfectly.

Related:What Are The Basic Parts Of Ammunition?

Essentially they’re best for plinking and small game, but they can’t be reloaded and any high-powered round is going to be centerfire.

Centerfire Pros and Cons

Ammunition

Centerfire rounds make up pretty much any powerful round that you’re able to buy. Since the brass doesn’t have to be damaged by the firing pin the casings can be much thicker and that means more powder and larger projectiles.

They’re also quite a bit more reliable than rimfire cartridges. This is because the primers are standardized and inserted separately, while rimfire cartridges have a wet primer placed in them and are then spun to get it to the edges of the case.

They also tend to leave less residue in your gun after firing since the powder burns more evenly. You should still be careful to clean your guns after putting rounds through them, but they’ll be able to be fired more times before the excess, partially burned powder causes problems.

The biggest advantage is, of course, reloading. You can reload a centerfire cartridge pretty easily, but make sure you pick primers that will be used within the amount of time you have before their shelf life expires. This allows you to customize the ballistics of your shot quite a bit, however, and many experienced hunters and marksmen get into reloading pretty quickly.

The only real disadvantage of centerfire ammunition is that it costs more per shot. This can be mitigated quite a bit by reloading your own shots, but it’ll still be a pricey affair at the end of the day.

Conclusion

Knowing the main difference between centerfire and rimfire is only the tip of the iceberg when it comes to understanding all of the intricacies of ammunition as a whole but it’s probably one of the most important differences for a newbie to understand.

Have a favorite round? Comments on our commentary? Leave us a line below and we’ll get back to you.

Filed Under: Gun, Shooting & Accessories 01:53 by Kevin Steffey

How To Shoot A Slingshot- Steps on How to Shoot a Slingshot Accurately

How To Shoot A Slingshot- Steps on How to Shoot a Slingshot Accurately

Slingshot is a fun activity and is an excellent way to hone and improve your hunting skills. However, it is best to learn the basics of using a slingshot for safety and proper form to ensure that there will be no damages or casualties.

Slingshot should be considered as one of your weapons that should be handled with care and with full responsibility. So, read on and learn to be expert on this field through the following guided steps on how to shoot slingshots accurately.

Related: How To Aim A Slingshot – 4 Easy Steps to Superior Slingshot Accuracy

We have laid out all the needed steps for you to enhance your skills. We have also made sure to provide you the easy tips to use a slingshot properly. The following are the clear steps for you to follow.

Here’s What To Know

You can also watch this video:

First, gather everything that you will need.

The following are the recommended things that you should have while learning how to shoot a slingshot. Be sure to have these beforehand, so you will be able to save time and direct your focus on learning instead of going back and forth to find your materials:

  • A slingshot
  • Ammos

It is recommended to use round and dense objects. For your ammo, you can choose from marbles, fishing sinkers, arrows, glass balls and even small rocks. However, marbles and ball bearings are the best to use as they have striking colors which makes it easier for you to trace and evaluate your shots.

Ammunition Loading

Once all the needed materials are gathered. It is now time for you to start loading your ammo. You can do this by holding the bottom part of it with your hand which you are most comfortable using. Your opposite hand should place the ammo at the center part of the pouch and make sure not to let the ammo swing away since it will not contribute to your accuracy and precision.

To keep the bullets or marbles in one place, use your fingers, specifically your thumb and index finger. Also, ensure that the thumb and the strap are in parallel position with each other.

Ammunition Loading

The Proper Way to Aim your Shot

1

Hold It The Proper Way

Of course, you would prefer to hold the slingshot through your principal arm for you to have a better shot and for a more comfortable posture while shooting. You can then use your secondary arm to yank back the ammunition. This will allow your principal arm to get the needed strength to keep the slingshot steady while releasing the shot.

Then, you should hold the slingshot perpendicularly or flatly. You can do this by holding the slingshot up and raising your arm. There are a lot of shooters who prefer to keep the slingshot allowing the forks to be pointed upward while there is other that prefer to angle it slightly to the side.

One thing needs to be remembered is that slingshot comes in different sizes. There are those who are lengthier, while other are wider or narrower. So, you may need to make some changes with the way you handle the slingshot according to its form and size.

2

Be Mindful Of Your Stance

Your position will determine how confident and comfortable you are while you aim. So, if you are a righty person put your right forward while making your left foot be positioned behind and slightly pointed outward. Your knees should be bent slightly. The entire lefty person must do all the opposites of the above directions.

Also, this will allow you to form a solid base by keeping your feet facing forwards and be even with the width of your shoulders. Feet that are held close prevents you from getting a perfect balance and aim your shot accurately.

3

Sideways Is The Best Way

The principal arm’s shoulder which you will be using to hold the slingshot should be fronting the target. To do this, put the slingshot up perpendicularly and ensure that it is marginally slanting away from you. This will provide you ample space to free your arm to draw the slingshot band.

4

Don’t Forget To Breath!

Draw a breath into your lungs, and then ultimately release it. This will make sure that slight movements caused by breathing will be eliminated and can improve your aim while taking the shot. Also, you should learn to take the shot during your body’s natural respiratory pause or (NRP).

5

Get Ready To Fire

Give yourself time to aim slowly to your target. Position your head in a way that it is marginally allowing you to check your target while making sure that you are also clear from the bullets. You should take use of your dominant eye when targeting while closing the other. However, you should train yourself aiming your target using both eyes amidst the visual restrictions since this will help you improve your performance and skills in the future.

Ready to Fire and Shoot

Once you are ready with your hand and posture, it is time for you to fire your shot. Here are the following things to consider when shooting.

Hold It The Proper Way

Tug The Ammunition Using The Open Hand

Pull the band until completely stretched and make sure that all the triangles are visible and shaped by the splits of the slingshot.

Discharge The Band

Shoot the ammo and hit the target by flicking your wrist forward. Also, make sure that your thumb is not in the way of the projectile as it leaves the sling since this can be very painful and may cause injuries.

Conclusion

Now that you have the necessary steps for you and the proper slingshot shooting tips, you should be more comfortable and confident now as you have already learned the basics. One thing that you should always do is to keep on practicing and continue learning for you to improve and hone your skills. There is no better way to improve yourself but to keep on practicing and practicing until aiming and shooting become so comfortable for you.

Keep on learning and help us improve ourselves by leaving your comments and feedback to let us know what you think of this article. One thing that we can assure you, we will be with you throughout your whole slingshot journey.

Filed Under: Hunting 07:43 by Kevin Steffey

How Much Does Deer Processing Cost

How Much Does Deer Processing Cost

Deer processing cost varies from places to places. Thus, the question, “How much does a deer processing cost?” usually gets an answer of “it depends on” and has become a continuous struggle for everyone. Yes, we are also experiencing the same dilemma as you guys.

This is exactly the reason why we have decided to tackle the issue and somehow address the tight spot so that everyone will be on the same ground, or at least everyone can have a base amount where they can refer their estimates. Let us take guided step by step process for us to get to the best answer together.

How Much Does It Cost?

A lot of establishments charge $70 for their base package which includes skinning, cutting and wrapping. Other places are also within this range; give it more or less five dollar difference. For those of you who are interested in specialty items or has a specific plan for your meat, you may need to pay extra bucks depending on what you want and the size of the deer.

How Much Does It Cost

Other Costs to Consider

Skinning

There are a lot of processors who prefer for you to leave your deer whole and still with skin due to sanitation issues. Unwanted remains such as hair are very hard to get off especially when the deer has dug its nails in, and most of these processors do not want any traces of hair anywhere near your meat. Again, this is still business, and they value their clients’ feedback and satisfaction.

This is their way of protecting their business’ names. However, there are also establishments and deer processors, especially those with small processing sites and do not have enough storage facilities which require their customers to have it skinned beforehand and will only charge them for cleaning fee of at least $15.

Skinning alone would require you to pay $22 minimum. This is the reason why a lot of hunters skin their deer or take advantage of the packages offered by most processors which already includes skinning as part of the whole amount they are paying for.

Deer Skinning

The Usual Extras

Going into a processor site will not only require you to bring with you your hunt. It also requires one to decide what other services you would want for the processor to do for you and for you to decide what you want to spend, if any, on extras. To be able to determine these things beforehand will allow you to save more time instead of wasting few minutes deciding which one to get while on the counter.

Considering these things before going to the processing site will also result for you to avoid impulsive decision making which you will regret once the bill comes in. So, it is always better to think things ahead of time to avoid regretting and to save time and money.

Summer Sausage

Who does not want to always have a grip on this all-time favorite? Yes, we are in the same boat here. I also want to have a taste of jalapeño and cheese summer sausage! However, you have to consider that having your whole deer be processed into a sausage will be too costly for one (unless, money is not issue). The average cost of summer sausage is around $3 per pound. So, you might want to take a pause for this one and give yourself some time to think it through.

You can also watch the video:

Venison Bacon

Yeah, I know by only talking about this right now you are starting to drool, and you want to have taste of venison bacon. NOW. FAST. However, let me stop you right there and remind you that before you can have your venison bacon in your little Lala land, you have to pay around $4 per pound. Oh, did I pop your bubble? Opps!

Raw Venison

Burger

Now, having your venison grind is very affordable. A lot of processors only charge $0.50 per pound to ground and bag your meat. So, call your friends now and prepare for a grand burger party!

Jerky

A lot of processors are going the extra mile, and they offer special jerky preparations. In fact, most of these processors offer steak jerky and flavored jerky. The most common flavors are Teriyaki, Jalapeño, Black paper, and BBQ. There is also a variety of spiciness offers that one can choose from mild to hot and spicy.

One thing that one needs to be always reminded about is that most of these processors charge the cost of jerky basing on the raw weight of the meat. The cost is around $4 per pound of raw meat. Then, they will process the meat, season and cook it for you to receive it fully cooked, smoked and ready to eat.

Jerked Meat

Gentle Reminder

A lot of processors ask for a down payment most of the time. This is something that you should be prepared for since there are also hunters that expect to pay the full amount upon completion of the task. These processors usually ask $40 to $50 down payment or at least 50% of the whole amount to be paid.

Conclusion

Deer processing is a critical thing that one needs to consider especially to those who do not have the time and the expertise to process their deer. Although, a lot of people want to do it their own for them to be assured that they will be getting the meat which they hunted, taking the hunt to the processors will be a great help to ensure cleanliness and quality of the meat.

Related: How Much Meat From a Deer-Quick and Easy Way to Estimate Venison Yields

Basing from the discussions above, processing cost of the deer may take few bucks out from your pocket, but the result is very worthwhile since it does not only provide you with quality meat and other extra items but it also allows you to thoroughly enjoy your hunt after spending effort and energy hunting them. Now, that is what you call maximizing proceeds.

Filed Under: Deer Hunting 19:05 by Kevin Steffey

  • « Previous Page
  • 1
  • …
  • 35
  • 36
  • 37
  • 38
  • 39
  • …
  • 49
  • Next Page »
  • AffioraTool Privacy Policy
  • AffioraTool
  • Best Shooting Rest Reviews For A Perfect Hunting – Best Shooting Rests Reviews
  • Hunting Safety: 5 Best Treestand Safety Harnesses Reviewed
  • How Fast Can A Deer Run – How Hard Would It Be To Catch A Frightened Deer On The Run
  • Rice Bran for Deer- How to Effectively Use Rice Bran to Attract a Deer?
  • The Best Reloading Scale for Consistent Accuracy
  • Which Shotgun Choke Is The Most Open?
  • 17hmr vs 22lr: Which one Should You Use?
  • 5 Top Coyote Hunting Dogs That Are Proven To Be Tremendous Hunters

DMCA.com Protection Status

Deerhuntingfield.com is a participant in the Amazon.com Services LLC Associates Program, an affiliate advertising program designed to provide a means for sites to earn advertising fees by advertising and linking to Amazon.com. Additionally, deerhuntingfield.com participates in various other affiliate programs, and we sometimes get a commission through purchases made through our links.